Introduction
Welcome to the documentation for Varlog, a powerful log aggregation tool designed to make managing logs from remote servers easier and more efficient. Varlog is more than just a log aggregator, it's a complete log management solution that helps you stay on top of your logs and troubleshoot issues quickly and efficiently.
One of Varlog's standout features is its efficient log-reading algorithm, which is designed to read logs of any size quickly and efficiently. This algorithm uses a tail-based reversed iterator chunking approach, which allows Varlog to read the most recent output of any size log file in milliseconds.
But Varlog is more than just a log reader. It also comes with strong security features built-in. By default, access to logs and servers is restricted, and users must explicitly request access to them. Varlog supports JSON Web Tokens (JWT) as its authentication method, ensuring that users are securely authenticated before accessing logs.
Varlog also features a powerful API Sidecar, which is easy to install and run as a daemon on any hardware. The sidecar is platform-agnostic thanks to Rust's cross-compilation functionality, which means that it can be used in almost any environment. This orthogonal reuse feature doesn't impact the state of your application, regardless of Varlogs, making it easy to integrate Varlog into your existing infrastructure.
For users with larger networks, Varlog can also be used as a mesh network. This means that any server can be queried and, given it's provided with the correct access, that primary server will dispatch a retrieve request to all servers and aggregate. the logs. This makes it easy to access logs from any server on your network, without the need for additional configuration or setup.
One of the key features of Varlog is its flexibility. We understand that every organization has unique logging requirements, which is why Varlog can be easily configured to fit your specific needs. Whether you need to store logs for compliance purposes, integrate with other tools in your tech stack, or customize the log aggregation process itself, Varlog has you covered.
With Varlog, you can easily access your logs and troubleshoot issues with minimal delay, ensuring that your systems stay up and running smoothly. Whether you're a small business owner or a large enterprise, Varlog can help you streamline your log management process, making it easier to access and analyze your logs. With its efficient log-reading algorithm, strong security features, and powerful API Sidecar, Varlog is the go-to log management solution for any business.
We're proud of the work we've done to build Varlog, and we're excited to share it with you. Whether you're a user looking to simplify your logging workflow or a contributor interested in helping us improve Varlog even further, we hope this documentation will provide you with the information you need to get started.
System Design
Since Varlog can be started as both a sidecar and an aggregator, it is suited well for both large and small applications. This section includes two potential architecture setups, each with its own unique benefits.
Both of these architecture setups are designed to be highly scalable and flexible, allowing users to tailor their log management process to meet their specific needs. Users can easily manage their log data, troubleshoot issues, and ensure that their applications stay up and running smoothly.
Aggregator Architecture
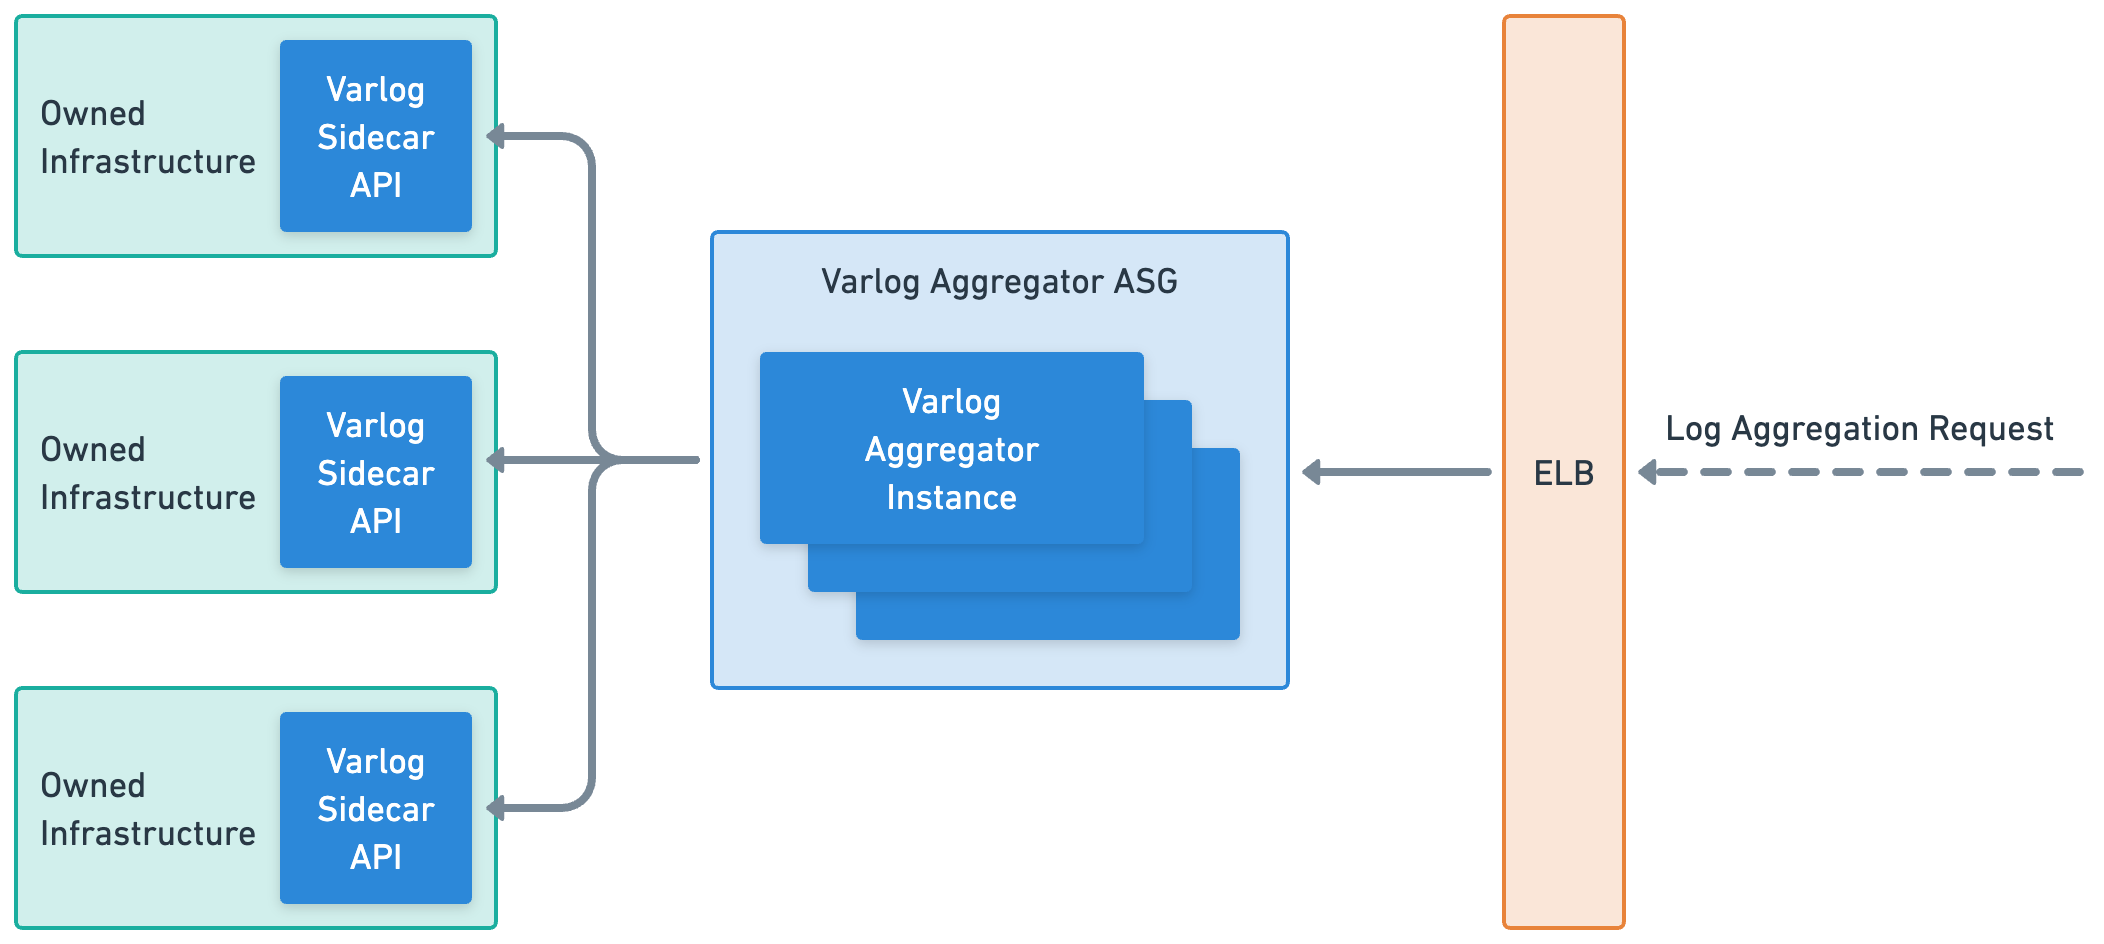
The first is the aggregator architecture, which is ideal for enterprise-grade applications with a large number of different services running. This architecture features an auto-scaling group of Varlog aggregator instances which are responsible for aggregating logs from sidecar API instances. The aggregator Varlog servers are highly scalable and can handle large amounts of log data, making them a great choice for organizations with complex and highly distributed systems.
While the aggregator architecture is a great choice for enterprise-grade applications with a large number of different services running, it may not be the best option for smaller users who have fewer servers to manage. This is because the setup and maintenance of an auto-scaling group of Varlog aggregator instances can be complex and time-consuming, and may not be necessary for smaller-scale log management needs. Additionally, the added complexity of the aggregator architecture will increase the cost of operation and may not provide enough added value for smaller users who can benefit from the simplicity and flexibility of the mesh network architecture.
Mesh Network Architecture
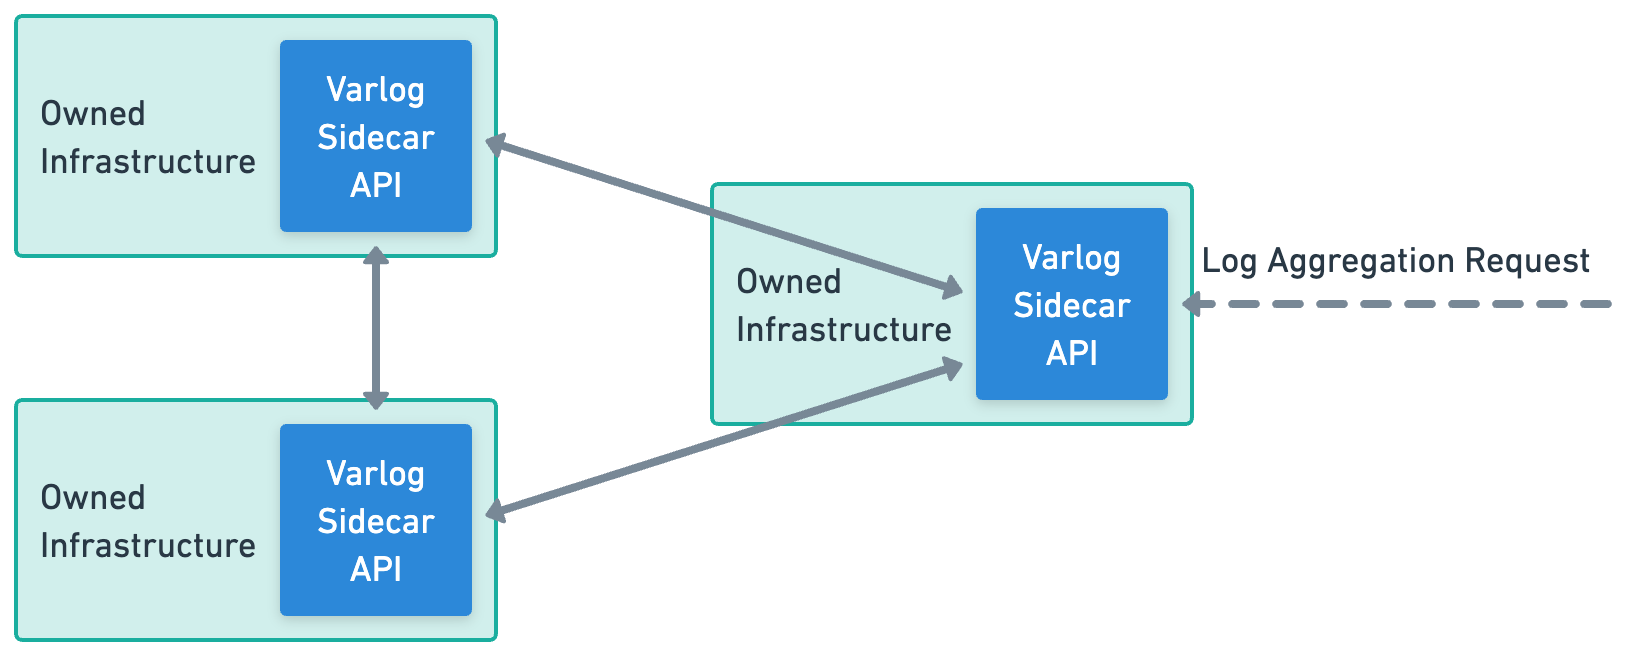
The second potential architecture setup is the mesh network architecture, which is perfect for smaller users who only have a few servers. In this architecture, each sidecar also acts as an aggregator, allowing any sidecar to be queried for logs from all other instances. This setup is highly flexible and allows users to quickly and easily access their logs without the need for a centralized log management system.
Since the mesh network architecture provides a simple and flexible option for smaller users, it may not be the best choice for larger, enterprise-grade applications with a larger number of different services running. One of the main reasons for this is that the mesh network architecture can become more difficult to manage as the number of servers increases. Paradoxically, this can also lead to higher operational costs and may require more time and resources to ensure that all nodes are properly configured and functioning correctly.
Additionally, the mesh network architecture may not provide the same level of performance and scalability as the aggregator architecture for larger applications. As the number of logs and requests increase, the mesh network may become overwhelmed and unable to provide the necessary level of responsiveness and speed that is required in enterprise-grade applications.
In this section, we've discussed the two possible architecture setups of Varlog, highlighting the benefits and trade-offs of each. The aggregator and mesh network architectures both provide distinct advantages depending on the scale and complexity of the application. In the next section of the documentation, we'll dive deeper into the trade-offs and design choices that were made while building Varlog. By examining the decision-making process, the goal is to provide readers with valuable insights and lessons learned that can be applied to their own projects.
Design Choices: Tradeoffs Made
In this section, we'll discuss the design choices made for Varlog and the tradeoffs associated with them. We'll begin by examining the core language used to build Varlog, which is Rust. We'll explore the advantages and disadvantages of using Rust as the core language for a Varlog. Then, we'll move on to compare the benefits of using a REST API Sidecar an alternative like a sidecar agent. Finally, we'll delve into the tradeoffs between on-demand log aggregation as compared to a storage layer for low-impact retrieval. By analyzing these design choices, we can gain a deeper understanding of Varlog's architecture and the reasoning behind its implementation.
Rust as the Core Language
Rust was chosen as the core language for Varlog due to its speed, memory safety, and thread safety, making it an excellent choice for a log aggregation tool. Additionally, Rust's control over memory usage leads to code that runs quickly and efficiently, which is critical for a tool like Varlog. Cross-platform support was another deciding factor, as Rust's ability to compile to various platforms and architectures allowed us to create a tool that can be run on any operating system.
While Rust offers many benefits, it does have a steep learning curve compared to other programming languages. Developers unfamiliar with Rust may face challenges when getting started with contriubting to Varlog. Additionally, compared to other languages like Java or Python, the Rust community is relatively small. This may result in fewer libraries or resources available to developers, which could impact Varlog's development timeline and future maintenance efforts.
| Advantages | Disadvantages |
|---|---|
| Performance | Smaller developer community |
| Memory safety and thread safety | Steep learning curve |
| Cross-platform support | Fewer libraries or resources available to developers |
Sidecare REST API
The Sidecar REST API was chosen for Varlog for a number of reasons. REST API's are flexible, familiar, and easy to implement, which can save developers time and effort integrating with the Varlog API. Additionally, the ability to query logs on an as-needed basis using the existing log files results in no storage requirements!
However, there are some disadvantages to this approach. Latency may be an issue due to the requirement for round trips to the server for log requests which are too large. This would require more bandwidth and processing power required compared to something like a sidecar agent, which would send logs to an external data warehouse as they're generated. However, since no external storage as a requirement was a goal of Varlog, this approach could not be pursued further. One benefit of the agent approach would be that the processing requirements for the agent would scale with the rate at which logs are written. With the REST API sidecar, the servers scale at the rate with which logs are requested. While this can be mitigated with rate limiting, it is still a risk.
| Advantages | Disadvantages |
|---|---|
| Ease of Integration | Scales external to normal server workload |
| Flexibility | Latency |
| Familiarity | Round trips for large requests |
| No Additional Storage Costs |
On-Demand Log Retrieval
Varlog's on-demand log aggregation was chosen for its zero-cost storage requirements and quick retrieval of only relevant logs. Aggregating logs on-demand requires fewer resources than storing all logs. This makes getting started with Varlog simple, since users can add Varlog to their existing infrastructure and immediately start benefiting from log management. As compared to something like a storage layer, Varlog has access to all of the existing logs for any given system, since it's not only sending new log events.
However, on-demand log aggregation may comes with real-time limitations, and it requires additional overhead to retrieve the logs. As covered in the sidecar comparison, this type of log retrieval results in the sidecar load not scaling at the same rate as the main servers workload. This issue would not be a problem with a storage layer, since the logs could be streamed to the storage layer as they're written.
| Advantages | Disadvantages |
|---|---|
| Zero-cost storage requirements | Real-time limitations |
| Quick retrieval of relevant logs | Additional overhead |
| Access to all existing logs | Scales external to normal server workload |
Overall, the design choices made for Varlog were carefully considered to balance the advantages and disadvantages of each approach. In the next section of the documentation, we'll explore some of the learnings discovered while building Varlog.
Learnings
During the development of Varlog, there were numerous successes, failures, and learnings. In this section we'll review some of these cases and what can be taken away from them.
Service Discovery
One of the challenges faced was service discovery for the mesh network
architecture. Initially, attemps were made to use the same approach as the
arp -a1 command to discover services on the network. However, piping to the
shell was deemed unreliable in various conditions2. After researching the
inner workings of arp further, an attempt was made to ping each IP in the host
machines network range and wait for a response, but it proved to be extremely slow
for network ranges with a 16 bit mask. However, arp is fast, so this could not
be how it was implemented.
After researching how the address resolution protocol works, a version was finally implemented which followed the proper protocols approach, using the MAC broadcast address to request hosts on the same network. The team researched arp further to understand MAC. While this did work, it only worked for hosts on the same network, and was ultimately abandoned as an approach. Despite this, much was learned about service discovery and a potential future improvement which could be added for a gossip-style protocol. This approach would boot machines with knowledge of all existing machines and send out their hostname to those existing machines. These machines would then store the received hostname. The core of the protocol involves periodic inter-process interactions for health checks of parallel machines, and this approach may be worth exploring in the future.
Tail-Based Reverse Log Iteration
Another challenge faced was achieving single digit millisecond lookup on files larger than 1GB. This problem could have been approached with a top-down scan, keeping the last n found lines in memory. The problem with this approach is that it would be slow to reach the end of the file, and Varlog is almost entirely concerned with only the end of a given file.
The implemented approach is based on the unix tail3 command. This algorithm seeks
to the end of the file, and reads backwards in chunks of 10 KB. By reading buffered
bytes backwards, the algorithm discovers new lines and adds them to a queue. This
queue is then used to pop results on demand until the file is exhausted or the number
of lines requested have been read. The one caveat to this approach is that requests
which skip more than half of the file will be slower than an implementation which
reads from the top down.
Cargo Workspaces
Cargo workspaces were not suitable for this type of project as it resulted in
unecessary dependencies being shared and built for each workspace. This resulted in
extremely slow docker builds which could not properly cache project dependencies,
since they were all dependent on the same Cargo.lock. In the future Varlog can be
reworked to separate each of the workspace projects into it's own repo, removing
this issue. Alternatively, the workspace approach could be abandoned in favor of
of workspace acting as it's own root crate.
Summary
Varlog's development was not without its challenges. There were a number of obstacles encountered with service discovery, achieving single digit millisecond lookup on large files, and cargo workspaces. These learnings will inform future work and help improve Varlog.
With this section concluded, that wraps up the Varlog system overview! If you're looking to setup Varlog locally, please continue on to the next section. For the API overview, you can start out with the Endpoints overview.
2 There's no way to be sure that a given machine would have the arp command
available. Also, installing the command on the host machine could not be considered
as that is outside of Varlog's control.
3 The referenced tail implementation.
Local Setup
In this section of the documentation, we'll review what's required to get Varlog running on your local. For the fastest response when building the app, we recommend the bare metal setup. However, the docker setup is a better replica of the prod environment, and should be used to validate the integration of new features.
Regardless of which setup type you choose, there is one thing you'll need to do
for both. You'll need to create a .env file in the root of the project.
This file is used to populate the expected environment variables.
JWT_SIGNING_KEY="a-super-secure-signing-key"
HOSTNAME="localhost:8080"
REGISTRY_URL="http://localhost:8888"
Optionally, you can create some fake data using the
fakedata cli tool. After you've installed
fakedata to your path, run the make fake1gb or make fake5gb commands to create
some fake data!
The next section reviews the setup requried for Varlog on bare metal. You can click here for the docker setup.
Bare Metal Local Setup
Each workspace within Varlog is created using Rust, from the backend all the way
to the frontend. To get started, you'll want to make sure you have
Rust installed. As of this writing, Varlog is built
successfully with version 1.69.0. One caveat is that Trunk
is used to Build, bundle & ship the frontend Rust WASM application, found in the
app workspace. We'll cover that one latter.
Server and Registry (Backend)
Both the server and registry workspace can be built using Rust. To do this,
you'll want to clone the repo and run cargo build. This will build a development
target and download/compile all of the dependencies across all of the workspaces.
Once this is done, you will only need to download and compile dependencies when
new ones are added.
App (Frontend)
Varlogs frontend is created using Yew, A framework for creating
reliable and efficient web applications. Since this application needs to be bundled
with WASM, the build system is a bit different. You'll want to cargo install --locked trunk in order to install trunk to your path. At this point, you should be
all set to run the app locally. To do this, simply run make app. This will create
a development server which will be updated on each change to the apps source code.
Putting it all together
Now that all dependencies and build tools have been installed, you're ready to start
the local development Varlog servers! In order for the system to startup properly,
you need to start the registry first. The server workspace is dependent on the
registry being up and running, and the local development setup will not work without
it.
You can start either the registry or the app first, but here are the recommended
commands to run (each in their own shell):
make registry→ Runs on port:8888wait until the the workers are running.make server→ Runs on port:8080make app→ Runs on port:8000
If you see the following outputs:
# registry
$ make registry
cargo run -p registry
    Finished dev [unoptimized + debuginfo] target(s) in 0.32s
     Running `target/debug/varlog_registry`
[2023-04-27T03:41:34Z INFO  actix_server::builder] starting 10 workers
[2023-04-27T03:41:34Z INFO  actix_server::server] Actix runtime found; starting in Actix runtime
[2023-04-27T03:41:36Z INFO  actix_web::middleware::logger] 127.0.0.1 "POST /register HTTP/1.1" 204 0 "-" "-" 0.000389

 # server
$ make server
cargo run -p server
    Finished dev [unoptimized + debuginfo] target(s) in 0.13s
     Running `target/debug/varlog_server`
03:41:36 [WARN] Could not create log file /var/log/varlog.log: Permission denied (os error 13).
03:41:36 [INFO] Successfully registered hostname.
03:41:36 [INFO] starting 10 workers
03:41:36 [INFO] Actix runtime found; starting in Actix runtime# app

# app
$ make app
trunk serve --proxy-backend=http://localhost:8080/v1 --address=0.0.0.0 --port=8000 app/index.h
tml
2023-04-27T03:39:55.272031Z  INFO 📦 starting build
2023-04-27T03:39:55.273230Z  INFO spawning asset pipelines
2023-04-27T03:39:55.525026Z  INFO building app
2023-04-27T03:39:55.526510Z  INFO compiling sass/scss path="app/index.scss"
2023-04-27T03:39:55.728798Z  INFO finished compiling sass/scss path="app/index.scss"
    Finished dev [unoptimized + debuginfo] target(s) in 0.20s
2023-04-27T03:39:55.764366Z  INFO fetching cargo artifacts
2023-04-27T03:39:55.866485Z  INFO processing WASM for app
2023-04-27T03:39:55.884411Z  INFO using system installed binary app=wasm-bindgen version=0.2.84
2023-04-27T03:39:55.884509Z  INFO calling wasm-bindgen for app
2023-04-27T03:39:55.979421Z  INFO copying generated wasm-bindgen artifacts
2023-04-27T03:39:55.981091Z  INFO applying new distribution
2023-04-27T03:39:55.981950Z  INFO ✅ success
2023-04-27T03:39:55.983413Z  INFO 📡 serving static assets at -> /
2023-04-27T03:39:55.983419Z  INFO 📡 proxying /v1 -> http://localhost:8080/v1
2023-04-27T03:39:55.983488Z  INFO 📡 server listening at http://0.0.0.0:8000
Then congratulations 🎉 You can now visit localhost:8000 and interact with the UI.
Troubleshooting
If you visit the UI and don't see any servers, check the server's logs. If you
see a log like the following, you need to restart the server after the registry
has been started.
[WARN] Error while registering hostname: error sending request for url (http://localhost:8888/register): error trying to connect: tcp connect error: Connection refused (os error 61).
Docker Setup
The docker setup is much slower than bare metal, but so long as you have docker
installed and running, it should (🫰) startup with relative ease. Since all of
the workspaces share all the same Cargo.lock file, some effort has been put in
to optimizing the projects build structure. Because of this, the docker compose
setup needs two make commands to be run first, and in a specific order.
ℹ Please be patient while running these commands, as they can take several minutes
make base← Creates the base Varlog docker image and tags it asvarlog/base.make build← Builds thevarlog/registry,varlog/server, andvarlog/appcontainers.
Once these containers have been built, you can run the make up command, which will
start the network of compose containers. After docker has finished starting these
containers, then run make ps to see the running containers. If there are 5 Varlog
containers, then congratulations 🎉 you can now visit the UI at
localhost:8000.
Contributing
Thank you for contributing to Varlog! Any help with this project is greatly appreciated. Now that your local dev environment has been configured, you should be all set to start making some contributions. Any kind of contributions are welcome, such as:
- Issue creation; found a bug? Please report it!
- Documentation; Our docs are always changing, and keeping them up-to-date is a large task.
- Features/Tech Debt; This directly impacts the future and vision of the project.
We recommend reviewing the open issues associated with this project if you're looking to create a PR.
Testing
Varlog has a test suite which can be run using the make test command. Note that due to requirements for full integration testing, the command is executed with sudo so that a true test can be performed for reading log files from disk.
All feature changes submitted to Varlog must include an integration test to validate the new functionality. Varlog uses Gherkin for integraiton tests, which can be found in the server/tests/features directory. We recommend using the existing Gherkin statements available where ever possible. However, in the case that you need to create a new case, please review the provided Gherkin documentation and add your case to the inteagration_tests.rs file.
API Specification
The following yaml provides an overview of the API Specification for the Sidecar REST API's V1 Endpoints. Additionally, you can download the Postman collection.
openapi: 3.0.0
info:
  title: Varlog
  version: 1.0.0
servers:
  - url: http://localhost:8080
  - url: http://localhost:8888
components:
  securitySchemes:
    jwtAuth:
      type: http
      scheme: jwt
paths:
  /v1/auth/register:
    post:
      tags:
        - default
      summary: Authorization Registration
      requestBody:
        content:
          application/json:
            schema:
              type: object
              example:
                paths:
                  - .*
                servers:
                  - .*
      responses:
        '200':
          description: Successful response
          content:
            application/json: {}
  /v1/logs:
    get:
      tags:
        - default
      summary: Logs
      security:
        - jwtAuth: []
      responses:
        '200':
          description: Successful response
          content:
            application/json: {}
  /v1/servers:
    get:
      tags:
        - default
      summary: Servers
      security:
        - jwtAuth: []
      responses:
        '200':
          description: Successful response
          content:
            application/json: {}
  /v1/servers/logs:
    get:
      tags:
        - default
      summary: Servers Logs
      security:
        - jwtAuth: []
      responses:
        '200':
          description: Successful response
          content:
            application/json: {}
  /v1/servers/logs/{filename}:
    get:
      tags:
        - default
      summary: Read Servers Log
      security:
        - jwtAuth: []
      parameters:
        - name: filename
          in: path
          schema:
            type: string
          required: true
      responses:
        '200':
          description: Successful response
          content:
            application/json: {}
  /v1/logs/logged.log:
    get:
      tags:
        - default
      summary: Read Log
      security:
        - jwtAuth: []
      parameters:
        - name: filename
          in: query
          schema:
            type: string
          example: logged.log
        - name: take
          in: query
          schema:
            type: integer
          example: '100'
      responses:
        '200':
          description: Successful response
          content:
            application/json: {}
  /register:
    post:
      tags:
        - default
      summary: Register
      requestBody:
        content:
          application/json:
            schema:
              type: object
              example:
                hostname: hello
      responses:
        '200':
          description: Successful response
          content:
            application/json: {}
  /registered:
    get:
      tags:
        - default
      summary: Registered
      responses:
        '200':
          description: Successful response
          content:
            application/json: {}